
send different username ssh-keygen CentOS
say you setup ssh-keygen on an account on your external computer to a network server, it works great as long as you type in “username@servername” this can get quite tedious, especially if this is what you have to do all day.
The fix is the per-user OpenSSH client configuration file, ~/.ssh/config. Anything you put there is applied automatically every time you run ssh, scp, sftp or rsync over SSH, so the remote username no longer has to be typed. It works the same on CentOS 6 and 7, RHEL, AlmaLinux and Rocky Linux 8, 9 and 10, Fedora, Debian and macOS.
Prerequisites
- An SSH key pair already created with
ssh-keygenand the public key copied to the server (see Setup SSH Password-less Login Linux). A password login works too; you just get prompted. - The username that exists on the remote server, called
remoteusernamebelow. - A normal shell on your local machine. Do this as your own user, not root: the file belongs to the account that runs
ssh.
Step 1: change to your .ssh directory
Here’s what you do:
login, and change to your .ssh directory
cd ~/.sshIf the directory does not exist yet (you have never run ssh-keygen or connected anywhere), create it with the permissions OpenSSH expects: mkdir -m 700 ~/.ssh.
Step 2: create the config file
from here create a file called “config”
vi ~/.ssh/configStep 3: set the default user
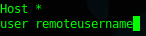
setup the config file as follows:
Host *
    user remoteusername
Host * is a pattern that matches every host you connect to, and User (keywords are not case sensitive, so user works) sets the login name sent to the server. Indenting the lines under Host is optional but makes the file easier to read.
Lock the file down. OpenSSH refuses to use a config file that other users can write to and stops with Bad owner or permissions on ~/.ssh/config:
chmod 600 ~/.ssh/confignow when you SSH, it will automatically send the username you just specified.
ssh servernameis now the same as ssh remoteusername@servername. A username typed on the command line still wins, so ssh otheruser@servername keeps working when you need a different account.
Better: one block per server
Host * sends the same name to every machine, including GitHub and servers where your account is called something else. Per-host blocks are usually safer, and they can also store the real hostname, port and key:
Host web1
    HostName web1.example.com
    User remoteusername
    Port 22
    IdentityFile ~/.ssh/id_ed25519

Host *.lab.local
    User admin

Host *
    User remoteusername
With that file, ssh web1 connects to web1.example.com as remoteusername with that key. For each setting ssh uses the first value it finds, so put specific Host blocks first and the catch-all Host * last.
Verify which user ssh sends
- Run
ssh -v servernameand look for the lines showing which config file was read and which user is authenticating. - On OpenSSH 6.8 and newer (CentOS/RHEL 7 and later, every current distribution)
ssh -G servername | grep -i ^userprints the effective username without connecting. CentOS 6 ships OpenSSH 5.3, which does not have-G.
Troubleshooting
- Bad owner or permissions on ~/.ssh/config: run
chmod 600 ~/.ssh/configand make sure the file is owned by your user. - The user setting is ignored: an earlier matching
Hostblock, or auser@on the command line, takes priority. Check withssh -v. - Permission denied (publickey): the username is now sent, but the key is not in that account’s
~/.ssh/authorized_keyson the server, or the server’s.sshdirectory permissions are too open. - Want it for every user on the machine: the same syntax works in the system-wide
/etc/ssh/ssh_config(on RHEL 8 and later, preferably as a file in/etc/ssh/ssh_config.d/), but a personal~/.ssh/configis usually the right place.
That’s it!
Hosted Linux Servers at www.zwiegnet.com/go
Related guides: Configure SSH Key Authentication Only | Allow SSH Connections Fedora 19