
This guide sets up Postfix on CentOS/Red Hat Enterprise Linux as an internal mailhub (smarthost) and outbound mail gateway: your servers and mail clients hand their mail to one Postfix box, and that box delivers it to the Internet. It was written for CentOS 6 and is republished here from the original blog with its screenshots; notes for current AlmaLinux, Rocky Linux and RHEL releases are at the end.
Postfix is a very secure, flexible mail server for relaying your email as an internal mailhub, or external mail gateway.
The Topology we are setting up is as follows:
Mail Clients –> Postfix Mailhub/Gateway –> Internet
Install and enable Postfix
Let’s get started, login, and su to root

the very first thing we want to do is make a backup of the postfix configuration
cp /etc/postfix/main.cf /etc/postfix/main.cf.bk
now let’s install the prerequisite packages necessary for troubleshooting (telnet for testing SMTP by hand, mailx for sending test messages). Postfix itself is installed by default on CentOS 6; if it is missing, add postfix to the same command.
yum -y install telnet mailx
we now need to verify the service will run after reboot, as well as starting/restarting it now.
chkconfig postfix on
service postfix restart
Customize main.cf for your network
let’s begin customizing postfix for our network:
vi /etc/postfix/main.cf
the first thing we want to do is set postfix to use only ipv4; if you turn off ipv6 at some point in the future, it would cause the service to fail.
change lines 119 and 120 to look as follows (line numbers are from the stock CentOS 6 main.cf; search for the parameter name if yours differ):
#inet_protocols = all
inet_protocols = ipv4
customize lines 116/117 to your environment. This is the interface postfix will be listening on; by default it only listens locally, so you need to open it up to the IP of the server.
#inet_interfaces = localhost
inet_interfaces = localhost, 192.168.1.50
this next step is critical, we need to tell postfix what networks to allow traffic from (mynetworks). Only list networks you trust; anything listed here can relay through the server, so never add 0.0.0.0/0 or you will run an open relay.
#mynetworks = hash:/etc/postfix/network_table
mynetworks = 192.168.1.0/24 192.168.2.0/24 192.168.3.0/24
in this case we are going to accept mail from the following networks: 192.168.1.0/24 – 192.168.3.0/24
next you want to customize where the email is coming from by specifying the external hostname of your mail server.
myhostname = mailserver.yourdomain.local
now we need to set the ‘domain’ for outbound email addresses; you may need to set it .local or .com, depending on your environment.
mydomain = yourdomain.local
restart postfix to ensure all your settings worked
service postfix restart
Setup TLS Secure SMTP
since we live in the age where we can no longer run insecure protocols, and everything needs to be encrypted, this is a necessary step.
first we need to create a directory to store our ssl certificates
mkdir /etc/postfix/ssl
generate a self-signed cert (you may want to use an official cert here)
openssl req -x509 -nodes -days 36500 -newkey rsa:4096 -keyout /etc/postfix/ssl/postfix.key -out /etc/postfix/ssl/postfix.crt
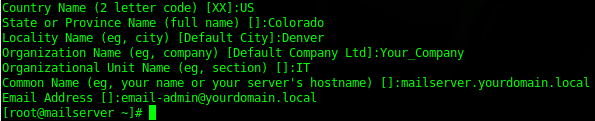
fill out the cert info as applies to you. The Common Name should be the host name clients use to reach the server:
The private key should only be readable by root:
chmod 600 /etc/postfix/ssl/postfix.keynow we need to tell the postfix instance about the ssl settings/certificate, etc.
vi /etc/postfix/main.cf
add the following to the postfix config at the very bottom:
# -- TLS Settings -- #
# With this, the Postfix SMTP server announces STARTTLS support to remote SMTP
# clients, but does not require that clients use TLS encryption.
smtpd_use_tls = yes
smtpd_tls_security_level = may

# Configures the server certificate file and key file as well as the CA's
# intermediate certificate file.
smtpd_tls_cert_file = /etc/postfix/ssl/postfix.crt
smtpd_tls_key_file = /etc/postfix/ssl/postfix.key

# Enable logging of summary message for TLS handshake and to include
# information about the protocol and cipher used as well as the client and
# issuer CommonName
smtpd_tls_loglevel = 1
smtpd_tls_received_header = yes

# Postfix SMTP server and the remote SMTP client negotiate a session, which
# takes some computer time and network bandwidth. SSL protocol versions other
# than SSLv2 support resumption of cached sessions.
smtpd_tls_session_cache_database = btree:/var/lib/postfix/smtpd_scache

# Cached Postfix SMTP server session information expires after a certain
# amount of time. RFC2246 recommends a maximum of 24 hours.
smtpd_tls_session_cache_timeout = 10800s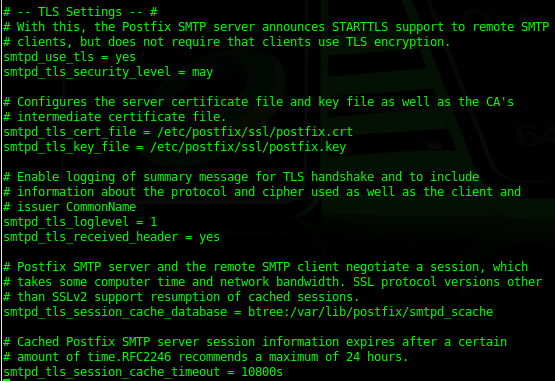
once this is completed, since there are a few config changes, we should immediately restart postfix to make sure the settings worked.
service postfix restart
Set how long mail stays in the queue
From here there is one final thing that needs to be considered: how long do you want mail to spool on the server? The default is 5 days; is that too much? Too little?
you can override these settings in the postfix config. A plain number is read as days:
#Increase Mail Spooling from 5(default) to 7 days
maximal_queue_lifetime=7
as always when there is any config change, you want to restart the service to be sure the settings worked.
service postfix restart
Test the mailhub
ok, now it’s all setup and working, we just need to test it. Make sure TCP port 25 is open in the server’s firewall (iptables on CentOS 6) for the networks you listed in mynetworks.
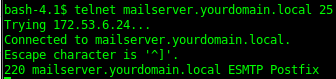
From a remote host, telnet to the server on port 25, and test if it works:
telnet mailserver.yourdomain.local 25
you should see the following:
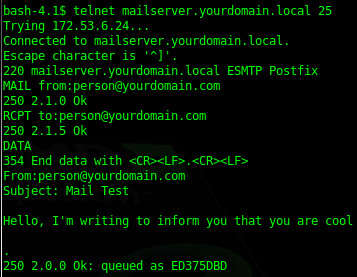
you can perform an entire test as follows (end the message with a line containing only a period):
MAIL from:person@yourdomain.com
RCPT to:person@yourdomain.com
DATA
From:person@yourdomain.com
Subject: Mail Test

Hello, I'm writing to inform you that you are cool

.
you can check the status of your mail queue using the ‘mailq’ command.
mailq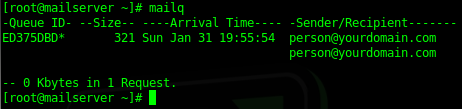
obviously the test email we sent is non-deliverable. We can check why in the maillog
tail /var/log/maillog
here’s the status of the last email:

- status=sent means it sent
- status=rejected means that your server/ip is not allowed to send to that server.
- status=deferred in this case timed out, because the firewall is blocking outbound email from that server.
for more info, try man postfix; it contains lots of good info on doing a mail flush, queue delete, etc. (for example postqueue -f to flush the queue and postsuper -d ALL to delete every queued message).
To setup CentOS clients to use the new mail server, see Configure Postfix RelayHost CentOS/RedHat.
On AlmaLinux, Rocky Linux and RHEL 8, 9 and 10
The same main.cf parameters still apply. The commands around them have changed:
- Install with
dnf install postfix telnet mailxon RHEL 8, ordnf install postfix telnet s-nailon RHEL 9 and later (s-nail provides themailxcommand), and enable it withsystemctl enable --now postfix; usesystemctl restart postfixinstead ofservice postfix restart. - Rather than editing by line number, set values with
postconf -e, for examplepostconf -e "inet_interfaces = localhost, 192.168.1.50", and check your work withpostconf -nandpostfix check. smtpd_use_tls = yesis the old (pre-2.3) way to turn on opportunistic TLS and has been superseded bysmtpd_tls_security_level = may, which on its own does the same job, so you can leave smtpd_use_tls out. Runpostconf -mto see which lookup table types your build supports and switch the session cache frombtree:tolmdb:if btree is not listed.- Open the port with
firewall-cmd --permanent --add-service=smtpandfirewall-cmd --reload. - Logs go to the journal as well as /var/log/maillog when rsyslog is installed:
journalctl -u postfix. To test STARTTLS from a client, useopenssl s_client -starttls smtp -connect mailserver.yourdomain.local:25.
That’s it, now you have a basic idea how to setup a postfix mailhub/gateway.
Hosted Linux Servers at www.zwiegnet.com/go
Related guides: Configure Postfix and Dovecot on RHEL, AlmaLinux, Rocky and Oracle Linux | Postfix and Dovecot Cheat Sheet