
Configure Dynamic DNS(DDNS) CentOS
Configure Dynamic DNS(DDNS) CentOS
Dynamic DNS allows you to dynamically update your zone files, without needing to restart the BIND/Named service, as well as immediately pushes changes to slaves. This is a wonderful enhancement of the BIND package, and should be the default and prefered way to deploy DNS both internally, and publicly.
our DNS domain we are going to setup will be called “test.local” you can choose what you want
Login and su to root

the first thing we need to do is install the BIND packages

configure bind/DNS to run on startup

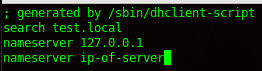
now modify the /etc/resolv.conf to reflect the local server, ip, or localhost (your environment may have specific requirements)
now we need to re-generate the dynamic dns key
now we need to add it to the /etc/named.conf on line 44

add lines 46 and 47, that way localhost can get status of the named service

for ipv4, add the local network if internal, or any if external dns, you can choose to configure ipv6, or comment it out if you do not use it. Replace 192.168.1.x with your network, or any

lines 17 you want to allow query, you can put your network or any.
** LINE 18 – you want this set to yes if it’s an internal dns server, and NO if it’s external, that way you don’t get DDoS Attacks.

now we need to specify DNS forwarders for queries that cannot be resolved by the local server(s)
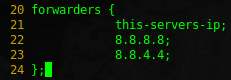
make sure you have the local server’s IP, otherwise dynamic DNS will not work, also include google’s DNS servers, they can resolve anything yours cannot.
also add the max journal size, these can get quite large over time

from here we need to set the proper permissions on the rndc.key

restart bind to make sure your configuration is correct

let’s create our zone files. cd /var/named/dynamic, and copy from the blank zones, as you can see, we made both forward and reverse DNS zones

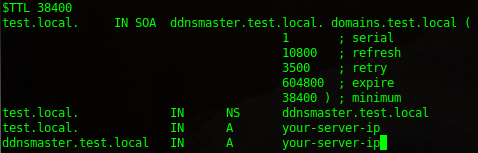
modfiy the forward zone to look as follows, don’t forget to set the serial to 1:
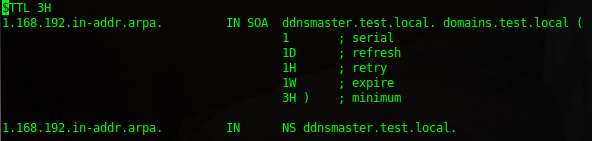
modify the reverse zone to look as follows, don’t forget to set the serial to 1:
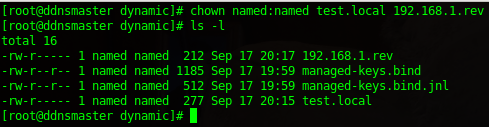
change ownership of your DNS zone files to named
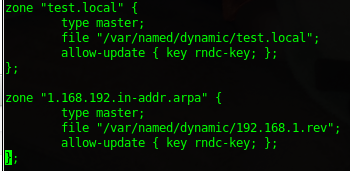
now create the forward/reverse zones in /etc/named.conf
** If External, you want to additionally specify where you want to allow zone transfers to slave servers
allow-transfer {
slave-server-ip;
};
restart bind again to make sure it picks up your new zone files

now we need to make bind able to write to the dynamic folder

DNS Update with nsupdate:
Let’s verify dynamic DNS works, cd to /tmp

we are going to add an A record, and a PTR, basically forward and reverse DNS for an address

save and close
issue the following command to send the DNS changes to DNS:
now let’s verify it worked, tail /var/log/messages

you should see something like “rndc-key approved, and “updating zone” for your forward/reverse.
use nslookup/dig to verify dns in fact did update
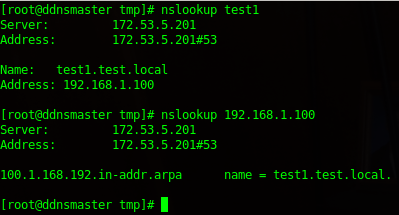
success! You have successfully configured dynamic dns!
- For other Dynamic DNS updates, take a look at the nsupdate cheat sheet
- To configure a Dynamic DNS Slave Server, click here
- To configure DHCP with Dynamic DNS click here
Hosted Linux Servers at www.zwiegnet.com/go
3 Comments